
DIY Leather Repair: Fixing Scratches, Fading & Tears Like a Pro
I still remember the first scratch on my leather jacket. It felt painful, almost personal. I thought the was ruined. But I learned something important that day. Leather can be repaired, and you don’t always need a professional.
If your jacket, suit, or gear has scratches, faded color, or small tears, don’t panic. This leather repair guide will show you how to restore leather at home safely and correctly.
You don’t need fancy tools. You need patience, the right steps, and a bit of confidence.
Table of Contents
Why Leather Repair Is Worth It
Leather ages. That’s normal. But damage does not always mean replacement.
Good leather is strong. When you repair it early, you:
- Extend its life by years
- Save money
- Maintain comfort and safety
- Keep your gear looking sharp
Studies show minor leather damage spreads faster when ignored. Fixing it early prevents deeper cracks and tears.
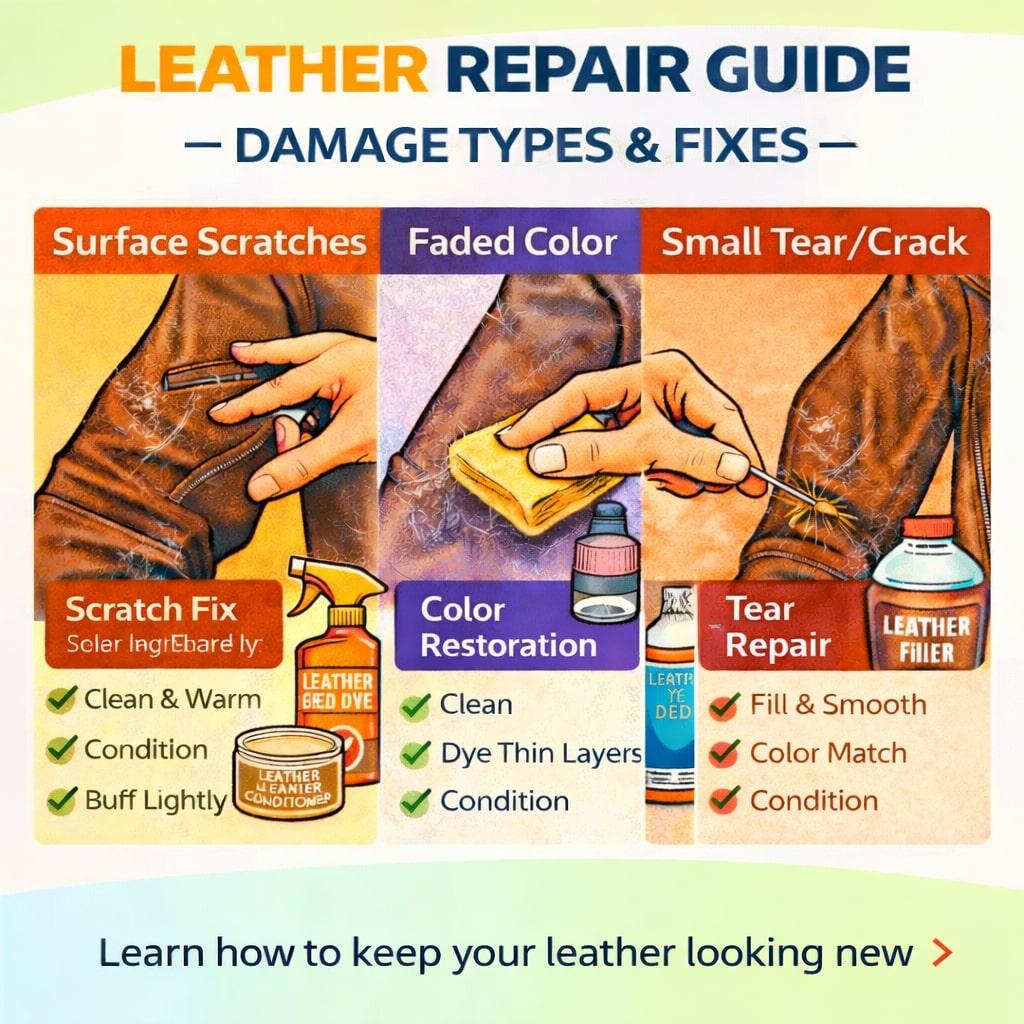
Common Types of Leather Damage
Before fixing anything, you must identify the problem.
1. Surface Scratches
These are light marks caused by friction or contact.
2. Faded Color
Sunlight, heat, and sweat pull color out of leather.
3. Small Tears or Cracks
Usually appear on elbows, knees, or seams.
This guide covers only small, home-repair-safe damage. Large tears or deep structural damage need professional repair.
Basic Tools You’ll Need
You don’t need expensive equipment.
DIY Leather Repair Kit
- Soft microfiber cloth
- Leather cleaner
- Leather conditioner
- Leather repair compound or filler
- Matching leather dye or balm
- Small sponge or applicator
Important: Always test products on a hidden area first.
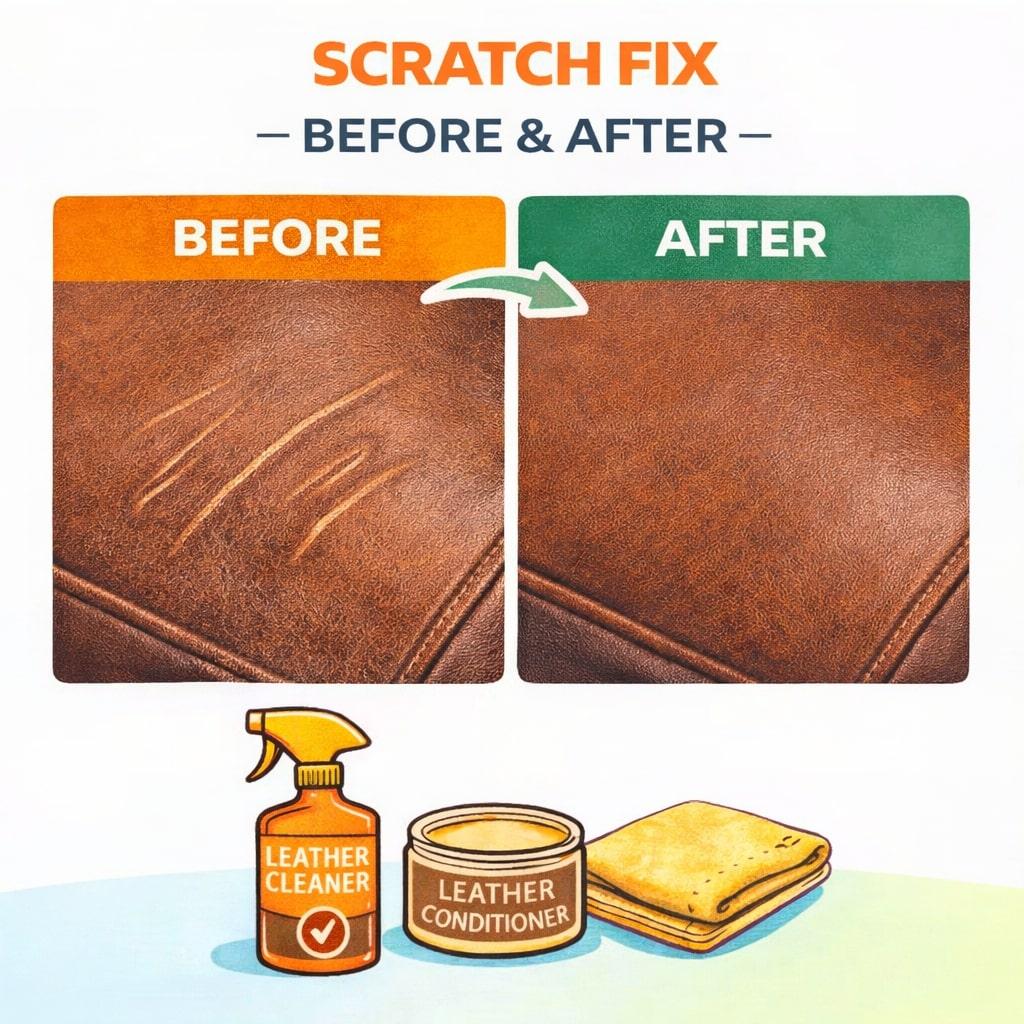
How to Fix Leather Scratches
Scratches are the most common type of leather damage—and luckily, they are also the easiest to fix at home. Most surface scratches do not damage the leather deeply. With proper cleaning, conditioning, and gentle handling, you can reduce or completely remove their appearance.
Step-by-Step Scratch Fix
Step 1: Clean the Area
Start by gently wiping the scratched area with a leather-safe cleaner and a soft microfiber cloth. This removes dust, sweat, and oils that can block the repair process. Never scrub aggressively, as this can spread the scratch or dry out the leather.
Step 2: Warm the Leather
Lightly rub the scratched area using clean fingers. The natural warmth from your hands helps soften the leather and allows its natural oils to rise. For shallow scratches, this step alone can noticeably reduce their visibility.
Step 3: Apply Leather Conditioner
Apply a small amount of leather conditioner to the area using a clean cloth. Massage gently in circular motions and allow the conditioner to absorb fully. This restores moisture, improves flexibility, and helps the leather regain a uniform appearance.
Step 4: Buff Lightly
Once the conditioner has absorbed, buff the area lightly with a dry, clean cloth. This evens out the surface and blends the scratch into the surrounding leather. In many cases, scratches will fade significantly or disappear completely.
If the scratch remains visible, apply a tiny amount of color-matched leather balm or cream. Use very thin layers and blend carefully to avoid dark spots or buildup.
How to Restore Faded Leather Color
Fading happens slowly, often from sunlight, heat, sweat, and regular wear. Many riders don’t notice the change until the leather looks dull, uneven, or washed out. The good news is that faded leather can be safely refreshed at home when done the right way.
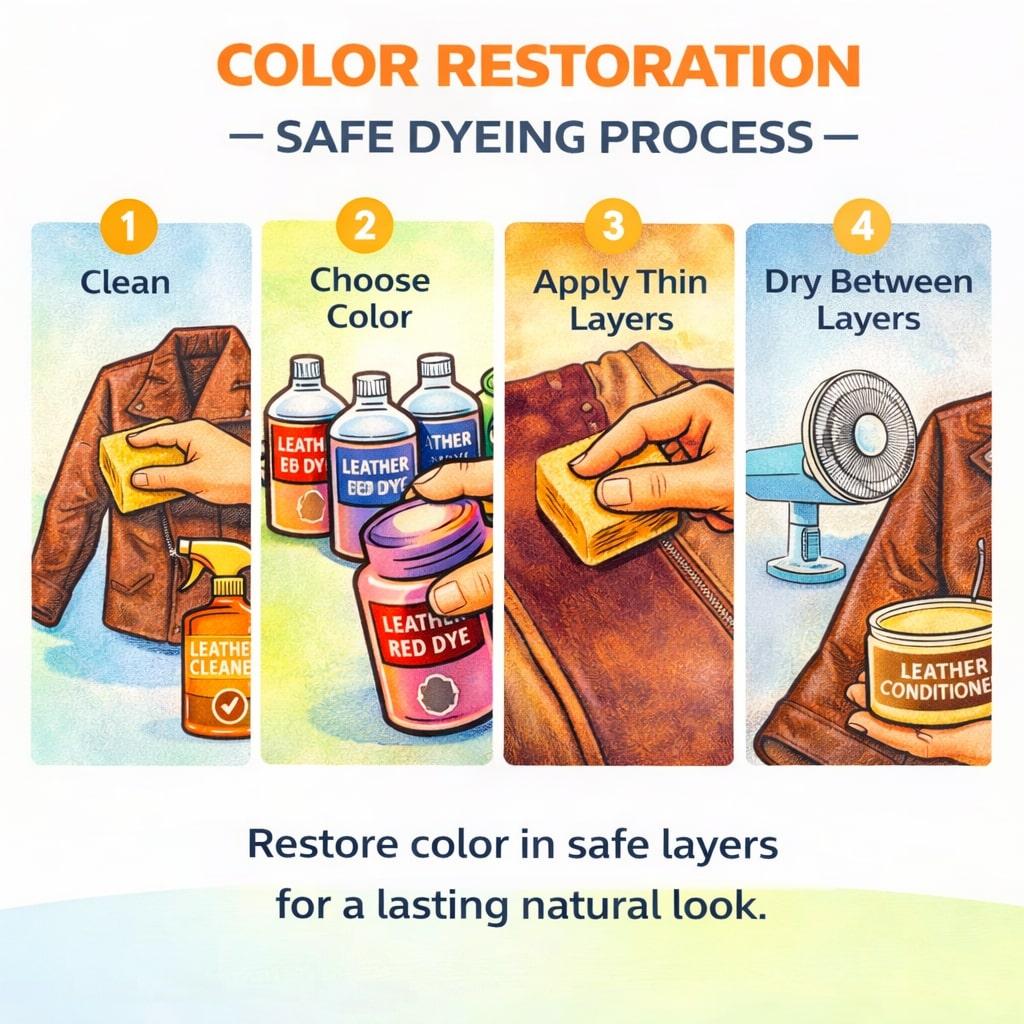
Step-by-Step Color Restoration
Step 1: Clean Thoroughly
Before restoring color, the leather must be completely clean. Dirt, oils, and residue prevent dye or balm from bonding properly. Use a leather-safe cleaner and allow the surface to dry fully before moving to the next step.
Step 2: Choose the Right Color
Carefully match the leather shade using a leather dye or color balm. If you are unsure, always start with a lighter tone. You can darken leather gradually, but reversing a color that is too dark is difficult.
Step 3: Apply Thin Layers
Use a sponge or soft applicator and apply color in thin, even layers. Dab gently rather than rubbing hard. Never pour dye directly onto the leather, as this can cause blotches and uneven coverage.
Step 4: Let It Dry
Allow each layer to dry completely before applying the next one. Patience is key here. Building color slowly creates a natural finish and prevents cracking or stiffness later.
Step 5: Seal and Condition
Once the final layer is fully dry, apply a light coat of leather conditioner. This seals in the color, restores flexibility, and gives the leather a healthy, even finish.
When done correctly, restored leather regains its rich look and natural depth—never shiny, heavy, or painted.
How to Repair Small Leather Tears
Small leather tears can look serious at first, but many of them are repairable at home when caught early. These usually appear in high-movement areas like elbows, knees, or seams. Fixing them quickly prevents the tear from spreading and keeps the leather strong.
Important Rule
If you can fit a finger through the tear, stop immediately. Large or deep tears affect the structure of the leather and require professional repair to maintain safety and durability.
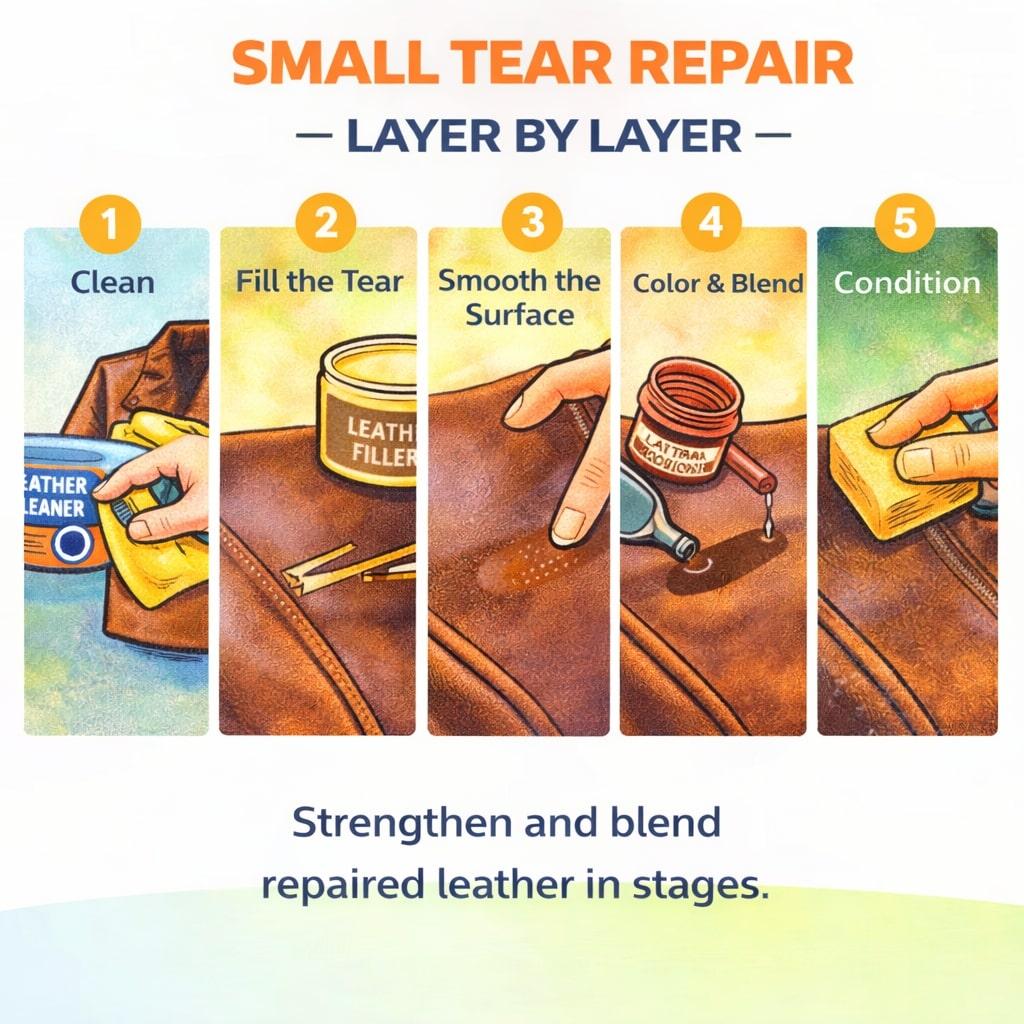
DIY Small Tear Repair Steps
Step 1: Clean and Dry
Clean the area thoroughly using a leather-safe cleaner. The surface must be completely dry before repair. Moisture or dust will prevent the filler from bonding properly.
Step 2: Apply Leather Filler
Using a toothpick or small spatula, apply a thin layer of leather filler directly into the tear. Press gently to fill the gap without forcing excess material onto the surface.
Step 3: Smooth the Surface
Carefully flatten the edges of the tear so they sit evenly. Light smoothing helps the repair blend naturally with the surrounding leather once cured.
Step 4: Let It Cure
Allow the filler to cure fully according to the product’s instructions. Do not rush this step. Proper curing ensures strength and flexibility in the repaired area.
Step 5: Color and Condition
Once cured, apply a small amount of matching leather color to blend the repair. Finish with a light coat of conditioner to restore softness and protect the repaired area.
When done correctly, this method restores the leather’s appearance and stops small tears from growing into serious damage.
Common DIY Mistakes to Avoid
Most leather damage happens during bad repairs.
Never Do This
- Use super glue
- Use nail polish
- Use shoe polish on riding gear
- Dry with heat guns
- Over-apply filler or dye
These shortcuts cause cracking and stiffness.
After-Repair Care Tips
Repair is only half the job.
Aftercare Rules
- Condition lightly after repairs
- Avoid riding for 24 hours
- Store away from sunlight
- Clean regularly
Well-maintained leather resists future damage.
If you want leather built to last longer from day one, explore:
Conclusion: Fix It Before It’s Too Late
Leather tells a story. Scratches and marks are part of the journey. But damage does not have to ruin your gear.
This leather repair guide gives you the power to restore leather safely at home. Take your time. Use the right products. Respect the material.
Repair your leather gear at home easily and keep riding with confidence.
FAQs
Can I repair leather myself?
Yes, for small scratches, fading, and minor tears.
Is leather repair permanent?
Proper repairs last years with good care.
Can I recolor leather fully?
Yes, but full recoloring needs careful prep.
Does conditioner fix cracks?
No. Conditioner prevents cracks but doesn’t fix deep damage.
When should I see a professional?
For large tears, structural damage, or safety gear impact zones.